

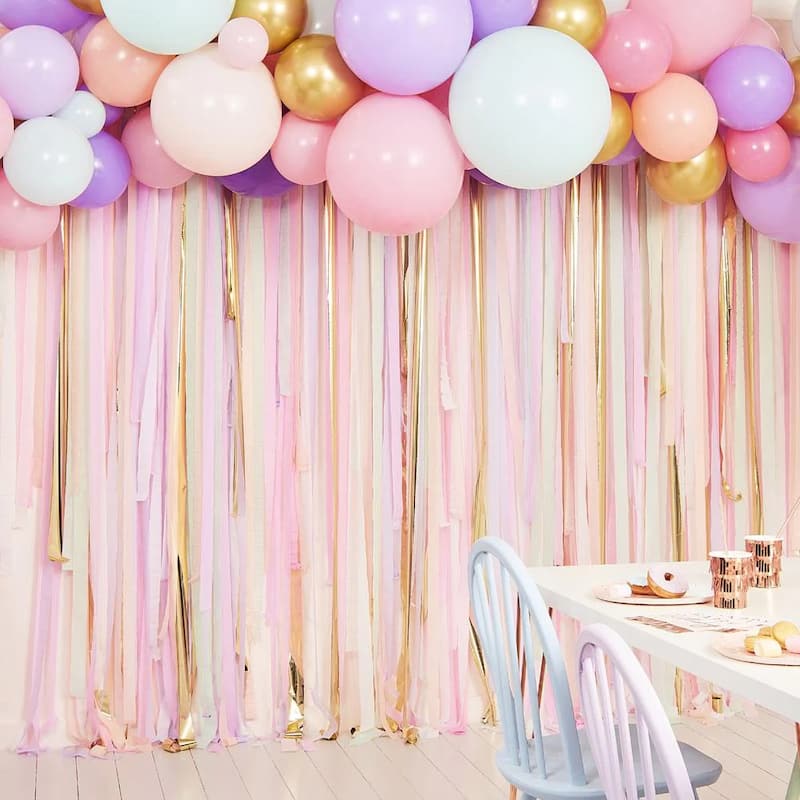
To begin with, how to decorate with streamers? You are supposed to create a crepe paper canopy, make a back-drop out of streamers, hang, drap, or wrap streamers, layer streamers, and fring streamers.
Every little thing matters when decorating for a party. If done carelessly, a straightforward task like hanging streamers can go wrong. A lot can be added to the atmosphere by doing it correctly. You can put forth a little effort and observe the difference it makes rather than simply taping them to the walls randomly.
Keep reading.
Table of Contents
How To Decorate With Streamers
Create A Crepe Paper Canopy
Over the hula hoop, fold the end of a crepe paper roll. Crepe paper should have its end resting back on the streamer.
Attach the streamer’s end with a staple. Using tape is an option if you don’t have a stapler.Crepe paper should be unrolled to the required length and then cut. From the room’s center to an exterior wall, each streamer must extend. The streamer needs to be a few feet longer than this distance in order to create a dramatic drape. You might want to estimate the length of the streamer longer than necessary just to be safe. This will let you change how the streamer drapes. Later, you can always trim it.
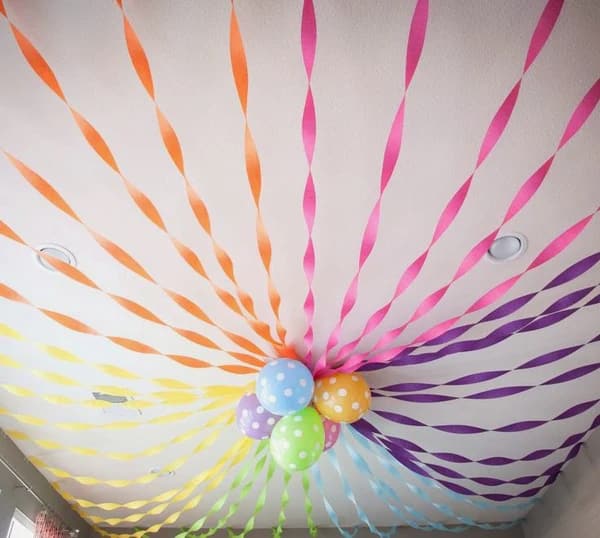
Repeat. Your hula hoop will be entirely covered if you keep adding streamers to it. Possible slight overlap between the streamers With the streamers, you can make a pattern or just randomly affix the crepe paper of various colors. Suspend the hula hoop from the center of the ceiling. The ceiling alone determines the attachment technique you employ. Tying the hula hoop to a light fixture or a beam is the easiest way to install it. If none of these options are available to you, think outside the box. The hula hoop can also be suspended from a hook that is hung from the ceiling.
Attach the streamers to the ceiling or exterior walls. Bring one streamer at a time to the room’s edge. Once the streamer’s drape is just right, use some Scotch tape to attach it to the exterior wall or ceiling. Continue doing so until the ceiling is covered in streamers. When finished, streamers will cover the ceiling.
Make A Back-drop Out Of Streamers
The size of your backdrop should be determined. Measure the backdrop’s length and width before you put it together. Tape, chalk, or a light pencil mark should be used to indicate the backdrop’s dimensions.Masking tape should be applied to the wall with the sticky side out. Along the top edge of your backdrop, extend a piece of masking tape from corner to corner with the sticky side out. Cover each end of the tape with a piece of masking tape to keep it anchored to the wall. Wrap streamers around the tape. From left to right, affix streamers to the masking tape. Each streamer should be rolled out to the desired length, then cut straight across. Layer the streamers slightly and switch up the colors as you go from one corner of the backdrop to the other. Put a piece of crepe paper along the top edge. Along the top edge of the backdrop, run lengths of rolled masking tape. Roll one streamer in a straight line along the backdrop’s top edge. In a similar way, tape both ends of the two small vertical pieces. The bottom of the streamers should be taped to the wall. Stretch a piece of masking tape, sticky side in, along the bottom edge of your backdrop. Directly affix both tape ends to the wall. Your streamers won’t be able to move if you use this piece of tape. Trim the streamers to a point just below the tape’s edge. Trim each streamer cautiously with a pair of scissors just above the tape’s bottom edge. Don’t worry about trimming each streamer precisely because you will cover the bottom with one. Utilize a piece of crepe paper to seal the bottom edge. The bottom edge of your backdrop should have several rolls of masking tape attached to it. Along the taped edge, roll a single streamer in a straight line. You’ll have a solid rectangle or square of crepe paper to pose in front of when the backdrop is finished.
Hang, Drap, Or Wrap Streamers
Throughout the venue, hang streamers. With a little scotch tape, streamers can be hung from nearly any surface. Cross a row of streamers across the top of a window or doorway. A table’s front or a chair’s back can also be decorated with streamers as an alternative.Wrap the space in streamers. Place the streamer’s taped end against a wall or table. Cross the surface with the streamer loosely in place. As you go, periodically tape the streamer to the surface itself to create a “U” shaped drape.Streamers can be wrapped around a railing or banister. Attach the streamer with tape to the railing or banister at one end. Until the entire length is covered, tightly wrap the streamer around the banister or railing. Cut the streamer from the roll, then tape the end in place.
Layer Streamers
Increase the number of streamers you are using. By suspending two streamers simultaneously, you can brighten the area rather than using just one. Choose a pair of streamers in two distinct colors.Layer the streamers. Tape the ends of the streamers together after positioning them so that their ends meet. Each streamer should be stretched out to the desired length and then cut.Glue the ends together. The layered streamers’ ends should be stapled. If you don’t have a stapler, you can tape the two streamers together.Hang the streamers. The layered streamers should have one end attached to something. Twist the streamers as you move to the other attachment point. the other end to a surface.
Fring Streamers
Stack the streamer in layers of 12 inches (30.48 cm) by folding it over on itself. This will make it possible for you to quickly and effectively fringe the entire length of the streamer. Cut the folded streamer from the roll once you have reached the desired length.Your streamers should be fringed. Make several cuts with a pair of scissors up and down the two long edges of the folded streamer. When you’re done, the streamer will have a festive, thin fringe running up and down both edges. To prevent cutting the streamer, stop the scissors each time just shy of the center. Unfold the streamer. You will notice two continuous fringe edges as you unfold the streamer. Be careful not to rip the delicate crepe paper. Suspend the fringed streamer. With a piece of Scotch tape, secure the streamer’s one end to the surface of your choice. Twist the crepe paper as you carry the streamer to its opposite end. Glue the streamer’s opposite end to a different surface. To any party, the fringed streamers will add flair.
See more about
- How To Decorate A Piano Top To Fit Any Style
- How To Decorate A Two Tiered Stand In Easy Ways?
- How To Decorate A Chandelier For Christmas?
Additional Streamer Decorating Tips
Using masking tape, you can quickly affix streamers to a wall. Simply create rounds out of small pieces of tape so that the tape is sticky on both sides. One side can be fastened to a streamer, and the other can be fastened to a wall. You can fairly easily achieve the twisted streamer look if you so choose. One side of a streamer should be fastened to the wall. The bottom part should be taped to the wall after you hold the bottom end and gently twist it five times (or more if you want more twists).
The streamers can be taped along a wall in a pattern of contrasting colors and twists. Making arches out of the streamers also looks good. Bring it up once or more times along its length and tape those points to the wall after taping the two ends to the wall. You can leave space for them to drape if you want to dress up a doorway. With streamers, balloons look fantastic and can be attached with double-sided tape as well.
Ways To Make A Bow Out Of Streamers
Things You’ll Need
- Crepe paper streamers
- Clear tape
- Scissors
What decoration is more appropriate for birthday parties and other celebrations than crepe paper streamers? Consider making a bow out of streamers for corners or walls to dress up the look rather than hanging them straight across the ceiling.
- Choose the appropriate bow size for the location where you plan to use it. The streamer bows used for a party room’s walls and ceilings are larger than those used for chairs or decorations placed closer to eye level.
- Approximately six times the maximum width of the bow you want to make is the length of streamer you should cut. This will result in a multiloop streamer bow, which is suitable for larger sizes and elaborate decorations. Simple two-loop bows are not only much smaller and less visually appealing, but they also require much less streamer.
- To determine the center of the streamer length you cut, fold it in half. In front of you, place the center flat on a surface. Fold the cut streamer’s long ends so that they cross at the center.
- Until you have as many loops on either side of the center as you desire, continue making loops with the streamer on either side of the center. The loops can all be the same size or they can get smaller as you make more of them. Given the flexibility of crepe paper streamer, the more loops you create, the fuller and more aesthetically pleasing your bow will be.
- Place the streamer’s long tail ends toward the bottom of the loops. To assemble the folded-over streamer pieces, wrap a small piece of clear tape tightly around their center points. Just a little bit longer than the tails on the bow you’ve made, cut another length of streamer. The tails are left to hang down with the others after the center point has been wrapped around the tape piece and tied in the back. Tape additional tails to the back of the bow if more are desired.
Final Words
Start by affixing a few removable hooks in the middle of the ceiling to create a lovely streamer-decorated ceiling. The streamers should be inserted into the zip/cable ties before hanging. If you want, you can twist them and fasten the ends to the high points of the walls. A large room can make this more challenging, so you might want to attach the other sides to the far ends of the walls.
I appreciate you reading.