

Everybody can paint French doors as a weekend DIY project.
So, how to paint french doors?
To paint french doors: Give the doors some time to dry after priming, washing, and sanding them before painting. You can apply a flawless coat of paint with just a paint roller and brush. When the paint has dried, your French doors can transform into a cheerful and vibrant feature of your house.
Here’s the scoop.
Table of Contents
How To Paint French Doors?
Sand And Clean The Surface
While you can remove the doors to paint them, leaving them in the door frame makes the job easier. Place a tarp underneath the doors. Install a plastic tarp under the doors to protect your floors. A tarp is available for purchase at home improvement stores and other places that sell paint supplies.
Use 120 to 150 grit medium-grit sandpaper to polish any damaged areas. Now is the time to fix any dents or marks that may be present on your doors. To remove the surrounding material, rub the affected area. Continue doing this until the damage is gone, and then sand the surrounding areas to make them blend in and smooth out the finish.
Apply 180 to 220 fine-grit sandpaper to the doors to smooth them. To even out the doors and get them ready for fresh paint, lightly rub the sandpaper against them. Check all surfaces, including those you have already treated with a coarser sandpaper. Upon completion, the doors ought to appear even and smooth.
Dish soap and water are combined to create a gentle cleaning solution. 1 US gal (3.8 L) or so of water should be put in a bucket. Add a tablespoon or so of all-purpose dish soap. Unless it is made for tougher stains like grease, your regular dish soap works fine.
When cleaning a surface, dampen a cloth in the solution. Pour some soapy water into a clean microfiber cloth. Don’t let the cloth become sopping wet. To remove all of the dirt, oil, and sawdust that has accumulated over time, first squeeze out any extra water, and then thoroughly wipe the doors.
With a fresh microfiber cloth, dry the doors. Return to the doors with another microfiber cloth after obtaining it. They need to be totally dry. The remaining dirt that could damage the paint job should be eliminated during this second pass. When the doors are clean, immediately begin priming.
Prime The Doors
Wear a respirator and ventilate the area. When using primer and paint, always exercise caution. Any nearby doors and windows should be opened to let in fresh air. So you don’t end up breathing in fumes, think about wearing a respirator.
Wrap glass, door hinges, and knobs with tape. These areas should be covered with painter’s tape. The door knobs’ surrounding area, where they connect to the door, should be covered with tape. To shield the hinges, tape them. Additionally, wrap tape around any glass panels in the doors’ exterior edges.
Screw out the lock that has tape covering it. Next to the door knobs on the frame’s side is a metal component called the lock set. In order to remove it, you will require a Phillips head screwdriver. By rotating the screws in a counterclockwise direction, you can loosen it. Wrap tape around the lock before sliding it into place. Put a screw through it and push it back into the door.
In quick, even strokes, apply the primer to the doors. Purchase a bucket of paint primer at a hardware store. Spread it on the doors after dipping a brush into it. Paint on an even layer by moving slowly.
Before painting, let the primer completely dry. To find out the suggested drying time, refer to the manufacturer’s instructions on the label. The full drying time of primer is 3 hours. Paint as soon as possible to minimize the amount of dust that settles on the doors, though you can wait longer to ensure that it dries.
Apply The Paint
For difficult painting spots, use an angled brush. To reach areas a paint roller can’t, dip the brush into the paint and then use it. It’s ideal for hiding the ridges around the windows and the corners of the doors. Since the paint gathers there, start by tackling these challenging areas.
Put some paint on a roller. French doors are the ideal size for mini foam paint rollers. Roll the roller through some paint that has been added to a paint tray. You can start painting once it has been evenly coated. Start right away to prevent the door’s paint from drying out.
One side at a time, paint the doors. Apply the roller to the flat, wide areas of the door. Concentrate on one side at a time. To apply an even coat of paint, roll the roller along steadily. Cover every area that the roller can.
After the first coat dries, paint the doors once more. The recommended drying time is listed in the paint can’s instructions. Usually, it takes two hours. Reapply a second coat of paint after the first one has dried. Reapply the roller on large areas and the brush on small areas.
For up to a day, let the paint dry. To find out how long the paint takes to dry, read the manufacturer’s instructions once more. Although it usually dries in a few hours, you can wait a little longer to make sure it sets.
Examine the windows after removing all the tape from the doors. By now, any paint that accidentally got on them should be dry. Observe any paint smudges on the glass as you remove the tape.
Apply a scraper to the windows to remove the paint. The hardware store’s razor blade scraper can be used to complete the task. Placing the tool so that the blade faces the paint while holding it flat against the glass. As you move the blade toward the end of the glass, dig it under the paint. Paint should separate into peelable strips that you can remove with your fingers. See more about How To Paint A Piano
Paint French Doors Without Going Crazy
French doors are difficult to paint with a paintbrush because of their glass windows. With an angled brush or by first covering the glass with masking tape, you must carefully cut in around the glass.
It is simple to get paint on the glass without tape and practice cutting in. All the glass squares can be taped off, but it takes a long time. Thankfully, there’s a crazy simple way to paint your French doors and cover the glass without losing your mind.
Painting French Doors Without Tape
I wish I could go back in time and paint all the French doors with masking tape that I previously painted. The best technique for painting these glass-covered cabinet doors, windows, and doors is by far this one. Now, I primarily use this technique when painting glass doors.
Spray Paint Your French Doors
It takes less time and has a smoother appearance to spray paint French doors than to roll and brush paint. The quickest way to paint them and get perfect lines around the edge of the glass is with the masking liquid and a sprayer.
You can paint these doors with an HVLP sprayer. However, most paints require thinning in order to pass through an HVLP gun without clogging. To achieve a finer finish, another choice is to use an airless sprayer and a smaller size spray tip. When using an airless sprayer, you typically don’t need to thin the paint, but doing so makes the finish smoother. See more about Boat House Decorating Ideas
Conclusion
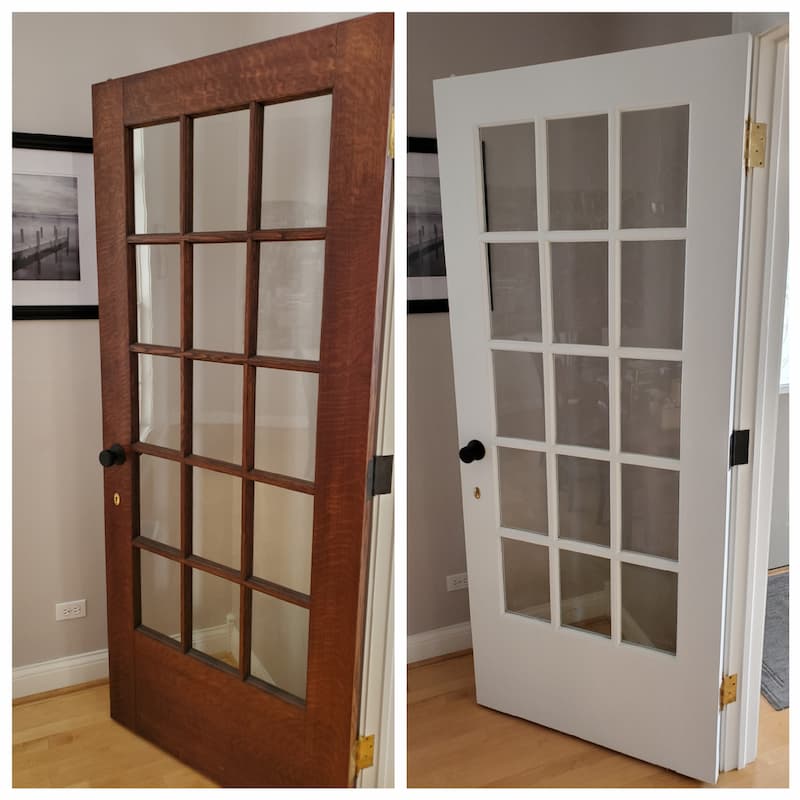
Before painting the doors, they need to be thoroughly cleaned, sanded, and primed. If the doors are not painted already, avoid using latex primer. Stained doors need to be primed with white shellac primer or an oil-based bonding primer. The wood is not sealed by latex primer, allowing stains to penetrate the paint.
If the doors are already painted and you’re just applying a fresh coat of paint, you can omit priming them. In that case, wash, scuff, sand, and paint them. For increased durability and coverage on stained doors, I always use two coats of primer and paint. Use fine-grit sandpaper between coats.
Use a utility knife or razor blade to score the dry masking liquid film along the edges of the door glass after the paint has dried to the touch. If you peel the film off the glass soon after spraying, it will come off easily because the film is rubbery when it is dry. Waiting too long will make it difficult to remove the masking film from the primer’s hardening surface and paint over it.
We appreciate you reading.