


Well, if you’re wondering how to install a range hood on a slanted ceiling despite these difficulties, you’re in the right place.
Let’s look at the basic steps of how to install a range hood on a slanted ceiling:
- Gather the Required Tools and Materials
- Make the Space for the Hood Frame
- Place a Slanted Support Block
- Join the Upper Bracket
- Connect the Duct Pipe
- Attach the Bottom Parts of the Range Hood
- Test the Island Range Hood
In this article, you will learn about how installing island range hoods help the environment within a room with slanted ceilings. Along with that, we’ll examine the detailed instructions for mounting an island range hood on a sloped ceiling.
So, without further ado, let’s get started.
Table of Contents
How to Install a Range Hood on a Slanted Ceiling?
You intend to put your island range hood on a slanted ceiling yourself, right? That said, it is undoubtedly feasible.
Here are the right steps that you need to take if you want to install an Island Range Hood on your vaulted ceiling:
Gather the Required Tools and Materials
Getting everything set up for this do-it-yourself installation of an island range hood on a slanted ceiling is the first thing you’ll do.
Here are the tools you’re going to need for this process of Installation:
- Support Block (For Slanted Ceiling)
- Duct Pipe
- Wood Saw
- Drill
- Nuts and Screws
- Island Range Hood
All these tools will come into use at certain steps within this process, so make sure you have them ready at the table.
Make the Space for the Hood Frame
Creating a hole for the Island Range Hood is the second step. What you’re going to do is basically cut out a square or a hole in the slanted ceiling for the Island Range Hood. For this, you can make use of the Wood Saw and the Power Drill.
You should enter the hole from the top of the kitchen space once you’ve made room for the Hood frame. This implies that you must have access to the attic area above the kitchen. For the subsequent steps, you will require it.
Place a Slanted Support Block
This step is vital if you want to securely attach the Island Range Hood to the slanted ceiling and guarantee proper safety and support. A slanted support block is what you’ll need.
Wood or any other strong material may be used for this. To connect the support block to the area above the ceiling and confirm that it is in the proper location, use the power drill.
This will ensure a nice aesthetic appearance and replace the upper outer cover of the Island Range Hood that you’re going to place above the frame of the exhaust system.
Join the Upper Bracket
The upper frame of the Island Range Hood is going to be connected to the support block. The nuts and screws that come with the Island Range Hood will be used to make this connection.
Use the power drill to connect the four sides of the upper frame of the Island range hood to the support block. Once the connection is made, you’ll have a proper frame where your Island Range Hood will be set up and clear the kitchen space air neatly and nicely.
Connect the Duct Pipe
If you want to exhaust the air and connect the island range hood to your home’s exhaust system, the duct pipe is a necessity. Once the hole has been made and the upper frame has been connected, attach the duct pipe to the kitchen space’s roof.
This step will also require access to the attic. To ensure that the duct pipe is perfectly connected to the main pipe in your home exhaust system, use glue or support blocks and a power drill. This will ensure that the Island Range Hood can operate without interference.
Attach the Bottom Parts of the Range Hood
It is now time to attach the range hood’s lower portions to the frame and the duct pipe that protrudes from the roof’s slope. For this step, you will require assistance from a friend or other person.
Grabbing the air damper, join the duct pipe at the top with it. The connection will then be made, and the damper will then be fastened to the frame. After that, take the Island Range Hood’s lower cover and affix it to the frame. This step will bring the installation process to a close.
Test the Island Range Hood
One last step is to plug the range hood into the outlet before you start cooking and enjoying the amazing air filtration and cleaning of the Island range hood. However, having the socket on the rooftop would be ideal.
So that there is no visible wiring and the aesthetic appeal is not diminished, install the socket in the attic and connect the Island Range Hood to it. You’ll then turn it on to check to see if it’s functioning properly. If so, your work has been successful. Congratulations on successfully mounting your island range hood on a slanted ceiling.
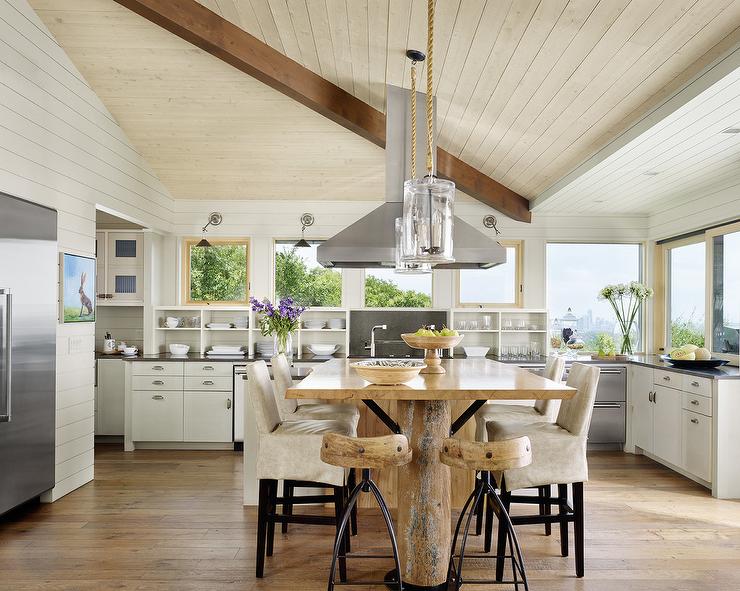
What Are Slanted Ceilings?
The two sides of the roof meet at a peak in homes with pitched roofs, like Tudors, where these ceilings can be seen. As a result, the sloped ceilings make cozy alcoves directly beneath the roofline in the attic levels and expand the space of living rooms with vaulted ceilings. Homeowners who wish to create one in a renovation or addition should check local building codes, which regulate how low (but not necessarily how high) a sloped ceiling can be before the space underneath it no longer counts as “living space.” Since the installation process is the same for flat and sloped ceilings of equal square footage, the cost of finished sloped ceilings should be the same. It’s also common for homeowners to decide to leave the ceiling beams exposed. Prices vary depending on where you live.
FAQs
How to Get Rid of Slanted Ceilings?
You would need to expose the rafters on the low side and the upper wall studs on the opposite high side. Next, you would nail new ceiling rafters level across the room. If more wood blocks are required to attach the rafters (which should be parallel to the wall), place them on the opposite wall.
Does a Range Hood Have to Touch the Ceiling?
Your range hood can be vented through the wall or the ceiling. Wall and under cabinet range hoods vent through the wall or ceiling, while island range hoods must be vented through your ceiling.
Should Range Hood Be at Eye Level?
You shouldn’t have to worry about running your head into the range hood while cooking or that it will obstruct your ability to move around the cooktop. Most people will also prefer to have the range hood installed above eye level.
Do Range Hoods Go All the Way to the Ceiling?
The vent duct must pass through or behind the cabinets to reach an exterior wall when a vented hood is mounted on a wall or beneath a cabinet. For a ceiling-mounted or island range hood, the duct must run above the ceiling.
Conclusion
Despite having a slanted ceiling, installing a range hood in your kitchen is simple if you have the right tools and follow our instructions. Go over our step-by-step instructions on how to install a range hood on a slanted ceiling once more if you are stuck in the middle of the installation to help yourself.
I hope this manual taught you a lot and that it has equipped you with the skills necessary to install the hood on your own.